Showing posts with label crafts. Show all posts

Sunday, February 2, 2014

Repurposed crayons

I get tired of the tiny broken crayons in he crayon box. If you feel the same way then you should totally repurpose those tiny broken pieces into multi colored crayons.


Repurposing crayons is easy and fun for all ages. Simply put broken crayon pieces into an old cupcake tin or container of your choosing. We sort the colors so that like colors are melted together. 


Next you place the tin in an oven preheated to 300'-350' for fifteen minutes or until they are melted. I don't melt them completely, just to the point were they are level. This way the remaining unmelted crayon pieces make a more vibrate color variation than if it blended completely. 


When melted to your liking remove from oven and cool until solidified. Once the new crayons are hard and cool turn the tin upside down and pop them out. 


It's that easy!!! Now you are ready to use your new repurposed crayons. 


Thursday, March 7, 2013

Pattern game for preschoolers

Patterns are fun to do as a daily "homework" game around my house.

However, my sons waste paper with the preschool booklets he has because he is good and finishes them rather rapidly.

So here is a reusable pattern game with Legos.

I love it and so do my boys. Win-win.


Friday, December 14, 2012

Little girl dress out of a T-shirt

This is a no sew repurposed T-shirt dress.

I took a pink shirt I had and cut off the sleeves. Out of the sleeve pieces I cut two strips and made a head band out of one and a tie for the back of the dress with the other.

It took me about five minute. All you need is a pair of scissors and a T-shirt.


Thursday, December 13, 2012

Repurposed Graco playpen

Make your own toddler bed or fort out of a portable playpen crib by simply cutting out the net.

This is a wonderfully simple repurposing gem that I found on Pinterest.

Lucky me I found an old playpen in truck of a car we are selling. It had gotten moldy so I did not feel bad/wasteful cutting out the netting.

Damien hopped right in as soon as I built it and hasn't gotten out yet.

He says its his ninja movie watching bed. LoL I love that little boy!!!!!

I put a blanket over the top but the one on Pinterest had a crib mattress over the top. FYI :-)

Sunday, November 18, 2012

Monster spray

Do you have a child who is afraid of the dark? If you do than you know what a struggle bed time can be.

My sweet little Damien recently decided that he is afraid of the dark.

Even though we have discussed in great lengths that there is NOTHING in the dark to be afraid of.

I tell him Mom and Dad are right next door as well as his big dog Odin, so he is super Protected all day and night always.

Needless to say Damien is still certain there is something so scary that he MUST sleep with mom and dad and that is the only solution.

I however have a trick up my sleeve, monster spray.

All you need is an empty room fragrance spray bottle filled with water.

This way is too much gets sprayed no one will get sick.

I made a label with some printer paper, marker, and tape.

I hope this helps other parents and kids out there in the life puzzle we all live in.

Wednesday, November 14, 2012

Fake makeup

Little kids love doing their makeup, it is fun, it is cute, but it can be too messy for this busy mom.

I'm not sure where I got the idea for this but I've made fake makeup for all my little ones that I've babysat over the years. It is always loads of fun for the little girls and boys that wish to do their makeup with me.

This is so simple you only need three things:

-An empty eyeshadow container
-Fingernail polish
-Patience because it takes a couple weeks to dry

Pour a thin layer of polish into the empty makeup container. Set out of the way to dry for two to three weeks.

Now you are ready to play. This is so easy and will last forever.

Monday, October 22, 2012

DIY Moon sand

This recipe is to make your own moon sand at home out of flour and oil.

Materials:
Flour
Oil
Container

I used baby oil but you could use any kind of oil.

I put a couple cups of flour in a container and slowly mixed in the oil until the mixture crumbled but could still hold shapes when pressed.

If it is too dry add more oil. If it is too wet add more flour.

I made the boys their moon sand in the summer and it is still just as fun as the day I made it five months ago.

The boys play with their containers of homemade moon sand all the time.  They focus on it which is rare for these wild boys.  I love that not only do the boys enjoy playing with this super cheap DIY moon sand but they love sharing the fun when their friends come to visit.  Friends and cousins of all ages get loads of entertainment from this simple craft.

Great craft for any age as long as they don't eat it :-)

I was going to make some up for gifts this holiday season. I just cant decide what size container to put them in.?.hmmmm....Or what color to make them?? Or maybe no color and just glitter, oh yeah, glitter! Sorry, squirrel.....................................


Wednesday, October 17, 2012

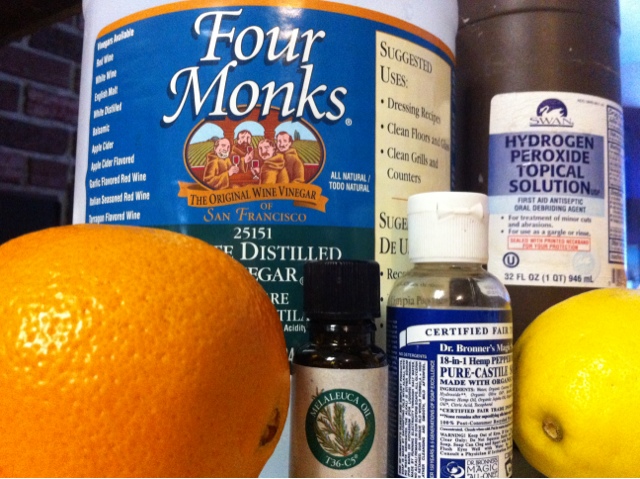
DIY all purpose cleaner

2 cups vinegar
1 cup hydrogen peroxide
1 to 2 tsp Dr. Bronners soap
30 drops tea tree oil
Citrus or any essential oil you like
Dilute with water until the concentration you prefer. 

I steeped my cleaner for two days to draw out the citrus and then strained it into a spray bottle.

This all purpose cleaner really works!!!!
It removed red wine and permanent marker stains. This stuff eats through grim and is all natural.

It has cleaned and deodorized everything I cleaned so far.

I can honestly say it is better than most of the natural store bought cleaners.

Great for kitchens, bathrooms, kids rooms, garages, floors, and probably anything else that can get icky and sticky.

Saturday, October 6, 2012

iPhone holder speaker amplifier

Take an tape cassette case flipped over on itself. It makes a great iPhone holder stand contraption. What is even better is it acts as an amplifier for the speakers if you are listening to music on your iPhone.

This is a great use of an old tape cassette case.

I love up-cycling stuff it's rad.

Monday, October 1, 2012

DIY solar cooker

I built this solar oven out of a reflective car windshield visor thingy. I bought it at the auto store. This project cost me less than $10

Supplies needed:
Visor thingy
Black pot with lid
Reynolds oven bag
Bucket


Ive read a lot about building DIY solar cooker online. From my research I have concluded that this style only gets up to higher temps like 350 in the southern states. I live in Oregon and can only get mine up to 240 so far.

Well that's enough free heat to cook a lot of things. So in my book this is a great skill to have.

My first day I heated up some turkey cheddar sausages for lunch and then cooked up a apple cobbler for dessert.
Both were awesomely delicious.

Saturday, September 29, 2012

DIY iPhone charging dock

My husband Kyle wanted a new charger by his computer. He already had the standard iPhone USB to 30-pin charger/sync cable connected to his computer. So after being inspired by some other crafty geek online, he designed his own.


His charger/dock/amplifier is steam punk. Which means that it is overcomplicated and unique.

He began by chiseling out a slot for the iPhone to sit in from a chunk of 2X6. He drilled out two holes side-by-side through that slot to run the USB end of the 30-pin cable.


Next he drilled out a hole for his pipe/amplifier. Once the two main holes on top were done he drilled a hole through the side to connect the two cut out sections on top. This tunnel is how the sound travels through the iPhone slot to the pipe.

Kyle had to drill straight through the side to get the sound channel where he wanted it. This left an unwanted hole on the side, which was easily sealed with some hot glue.


Once all the holes and cut outs were exactly how he wanted them we went to the craft store. While there, Kyle found sticky back cork paper that had fake writing on it. It was perfect. He also bought some brass tags and corner pieces from the scrapbook section.

Once home, I cut out the cork paper with an Exacto knife and wrapped it around the block, covering the holes.  I know how to work with corners, but I would suggest making a paper template to work with.


Have fun and get creative. This handmade dock is way cooler than any I have ever seen for sale. The best part is it is one of a kind.

Salt and flour dough

Mix 2 cups of flour with 1 cup of salt. Mix in cold water until it becomes the consistency of play dough.

Make shapes. I used stamps to stamp images on them. You can do whatever you'd like. You can poke a hole in them with a tooth pick to hang the finished product.

Once dough it done being molded and shaped. Bake at 250 for two hours or until hard.

I had some bigger shapes that took 3 hours.

I spray painted them this time but next time I want to try spray glitter.

Thursday, September 27, 2012

Repurposed shoe box lid

Materials:
Acrylic paint
Shoe box lid
Paint brush
Scraper or end of paint brush

Cover shoe box lid with paint. The thicker you put on the paint the more texture it will have.


Scratch any design you can think of.


I scratched in the boys first letter of their name and the age they are.

Really, skies the limits!

Friday, September 14, 2012

Make your own frozen dog treats

Blend half milk and half peanut butter in a blender until creamy.

Pour into Dixie cups sprinkle dog food pieces on top and freeze.

Unwrap on a hot day and give this puppy popsicle to those special pals.

Thursday, July 19, 2012

Candle

I love making cute candles for the dinner table.
Tonight it was windy so I got out mason jars so my tea lights would stand a chance.
I wanted something to add to the jar and tea light so I scrounged my pantry. I decided these pinto beans would work perfectly.
Anything would look cute; rice, beans, peas, pepper, the skies the limits.

Thursday, July 12, 2012

Time out glitter timer

One part gel, twenty parts water, add glitter and use as a soothing time out timer.

I added the gel a little at a time until it took ten minutes to settle. This was the time I was after. You could adjust the gel settling time to your own liking.

Thursday, June 7, 2012

DIY elf ears

I used gold card stock and folded it in half. On the fold is where I drew the curve of the ear while using the bottom edge of the paper for the flat opening for the real ear. I sketched out the pointy ear shape in pencil. Then I cut out the shape I wanted. Once it was cut out I used scotch tape to connect the front and the back leaving the flat bottom opened.

My first one didn't fit right so I had to make two sets. Good luck!!!! Happy elfing !

Free fun for kids

I save any container I use. Every jam jar, ketchup bottle, soda bottles, and anything else that I can wash clean. I even keep all my t.p and paper towel rolls. I am NOT a hoarder! I'm crafty :-)

I open a paper bag (which can also be used as a toy) and fill with like containers. I set my paper collector bags in the garage except the t.p roll bag that's under the bathroom sink. Whenever I need an extra container I can have one on hand, it's handy.

So when my children say I'm bored I will let them choose some containers or just give them the whole bag depending on how full it is.

You wouldn't think trash could equal hours of fun but it can if you add imagination.

Sunday, May 27, 2012

Bleach design shirt

This project is super easy and turns an ordinary shirt into a one of a kind in a minute.

Choose your piece of cloth and shaped stickers or tape. Put bleach in a spray bottle and set aside. Place a piece of cardboard behind cloth. Tape design or put stickers on the cloth. Spray once or twice over design. Promptly remove stickers or tape and rinse with warm water in the bathtub.
Only spray once to three times or it will be too much bleach. I learned this the hard way, now I have a shirt that is all bleached out with no cool design.
Wash cloth like you normally would after rinsed thoroughly.
Experiment and be safe, it is toxic.